Forensic Memory and Disk Acquisition on Windows VirtualBox
October 10, 2025 • Digital Forensic

Step-by-step guide on acquiring memory and disk from a compromised Windows VirtualBox machine for forensic analysis.
Introduction
Following the escalated incident on a compromised machine, the affected system was contained. The next step in the forensic process is to acquire both the memory and disk images of the compromised VirtualBox machine. This ensures proper evidence collection while maintaining forensic soundness.
Step 1: Pause and Snapshot the VM
Before performing acquisition, the infected virtual machine should be paused and a snapshot taken.
This guarantees that the current state of the system is preserved and can be revisited later if necessary.
Step 2: Locate VBoxManage Tool
VirtualBox provides a powerful CLI utility called VBoxManage.exe.
By default, it is located at:
C:\Program Files\Oracle\VirtualBox
To verify available commands, run:
powershellVBoxManage.exe --help
Step 3: Acquiring Memory
3.1 Identify VM UUID
Each VM in VirtualBox is uniquely identified by a UUID.
To list all registered VMs and their UUIDs, use:
powershell.\VBoxManage.exe list vms

3.2 Dump VM Memory
Once the UUID of the target machine is obtained, memory can be acquired using the debugvm feature:
powershell.\VBoxManage.exe debugvm <VM-UUID> dumpvmcore --filename "C:\Users\cryfo\OneDrive\Documents\Desktop\acquisition\windows10-memory.raw"
Explanation of parameters:
debugvm→ Accesses the VM debugging interface.dumpvmcore→ Dumps the VM memory contents into a raw file.--filename→ Specifies the path and filename for the memory dump.
Step 4: Acquiring Disk
4.1 List Virtual Disks
To identify available virtual disks and their UUIDs, run:
powershell.\VBoxManage.exe list hdds
This displays information such as:
- UUID (unique disk identifier)
- Location (file path)
- Storage format (VDI, VMDK, VHD, HDD)
- Capacity (logical and actual size)
- Attachment status (linked to VM or snapshot)
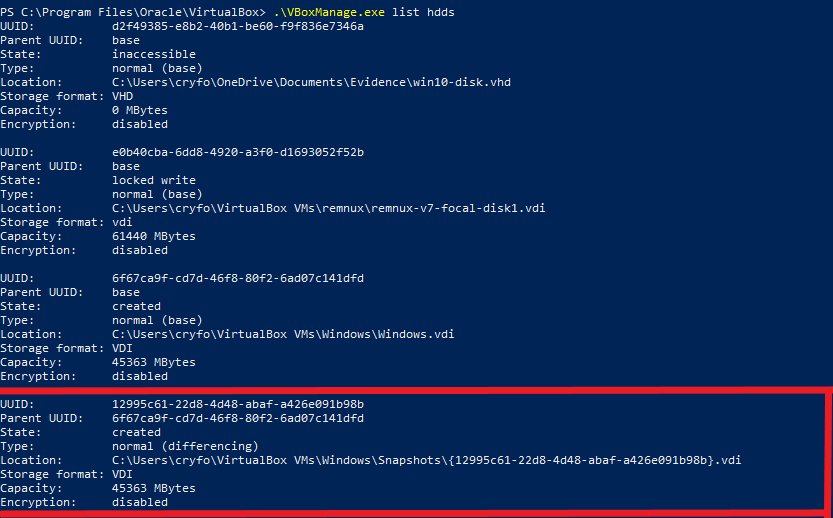
We focus on the disk corresponding to the snapshot of the compromised machine.
4.2 Clone Disk for Acquisition
After identifying the disk UUID, clone it into a forensic-friendly format such as VHD:
powershell.\VBoxManage.exe clonemedium <Disk-UUID> "C:\Users\cryfo\OneDrive\Documents\Desktop\acquisition\windows10-disk.vhd" --format vhd
This process may take several minutes depending on disk size.

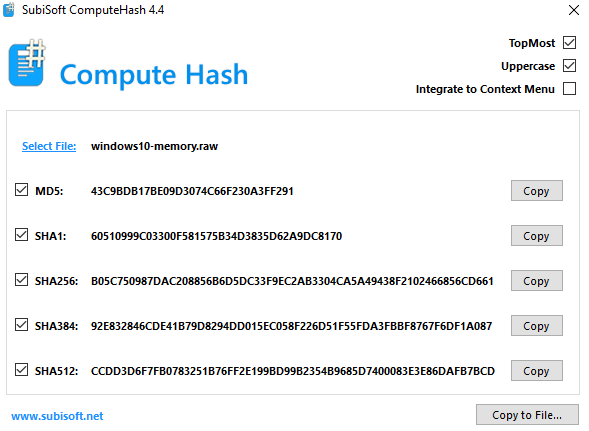
Step 5: Hashing Acquired Evidence
To ensure forensic integrity, compute cryptographic hashes (e.g., SHA256) for both memory and disk images.
This step validates that the acquired evidence remains unaltered during analysis.
Example using PowerShell Compute-Hash:
powershellGet-FileHash "C:\Users\cryfo\OneDrive\Documents\Desktop\acquisition\windows10-memory.raw" -Algorithm SHA256
Alternatively, certutil can be used on Windows:
cmdcertutil -hashfile "C:\Users\cryfo\OneDrive\Documents\Desktop\acquisition\windows10-disk.vhd" SHA256
⚠️ Note: Hashing large disk images may take significant time.
Conclusion
In this guide, we demonstrated how to acquire both memory and disk from a compromised VirtualBox Windows machine using VBoxManage.exe.
By pausing the VM, extracting memory, cloning the disk, and calculating hashes, we follow forensic best practices that preserve evidence integrity for further investigation.